Of all the amateur transmitters audio sections that I have modified, changed, or otherwise improved in the name of good high fidelity audio, the Johnson 500 is one of the most rewarding in terms of what the end product is like. After modifying of course!
The following changes can easily be performed in an afternoon or evening as long as you have all of the parts and have had some experience working on such equipment.
Remember: All the original audio circuitry was set up for limited audio response. The changes presented here have been performed on several transmitters with good results. The changes involved are noting more than changing values of resistors and capacitors to improve frequency response and/or decrease distortion. Shall we begin?
Back to front (modulator output to microphonium in.)
- Change C186-C187 to 100 pF/5kV or better (disc ceramic or doorknob type ) mod HV bypasses
- Change C219, C220, C221, C222. Originally 0.005 uF to 500pF/1kV disc ceramic (RFI/TVI bypasses to octal socket on rear deck of RF section)
- Change C214 from 10 uF unit to a 100 uF/150 VDC unit (6B4G cathode bypass)
- Change C211 from 0.1 uF to a 10-40 uF unit (audio decoupling)
- Add a 0.25 uF/50VDC or better across R163 (1800 Ohm V111 cathode resistor) This gives a “presence rise” or treble boosting effect. This is an optional change and is dependent on the type of microphonium being used and the type of audio that is desired. This value can be experimented with. Increasing from 0.25 uF will lower the audio frequency at which the boost effect takes places. Decreasing this value will raise the audio frequency, etc.
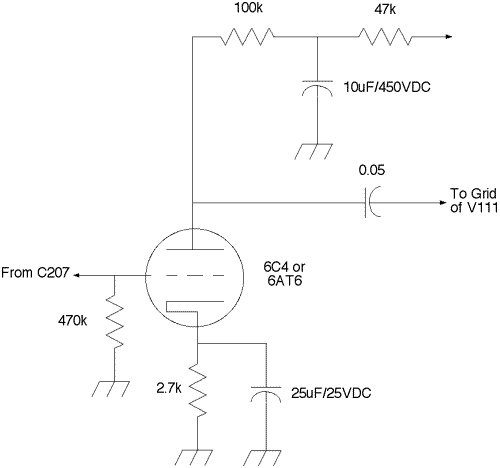
- Remove the clipper stage and associated filter which consists of two caps and an inductor. Do the following: Connect the end of C207 coupling cap that went to the 6AL5 clipper directly to pin 1 of V111 (6AU6). Change R157 from 100K to 470k grid resistor of V111. If more audio gain is needed, an additional audio stage can be added where the clipper tube was located. See Figure 1.
- Change C206 from 0.1 uF to 10-40 uF/450 VDC electrolytic (audio decoupling)
- Change R150 (2nd half of 12AX7 cathode resistor) from 680 to 1.5-2.2k
- Add a 25-50 uF/10VDC or better, electrolytic cap in parallel with R150
- Reroute fone patch line to a different part of audio circuit
- Change C205 from 0.1 uF to 10-40 uF/450 VDC electrolytic capacitor
- Change R148 from 220k to 47k (power supply decoupling resistor) first stage
- Change R146 from 1M to 5-10M (grid resistor/microphonium load)
- Change C203 from 330 pF to 47-100 pF disc ceramic (grid bypass for RF)
- Change R145 from 10k to 47k (RF decoupling/microphonium series resistor)
- Change C204 (0.001mFd) to a 0.01 mFd cap.
If you have followed the above changes you are pretty much at home plate.
The audio mods to the first stage are for high-impedance microphonium like the D-104. When using a good dynamic mic, like the EV664, terminate the input with the proper impedance (i.e. place a 50k resistor across the microphonium as a proper load). Electret-condenser microphonium work well with the existing high impedance input arrangement.
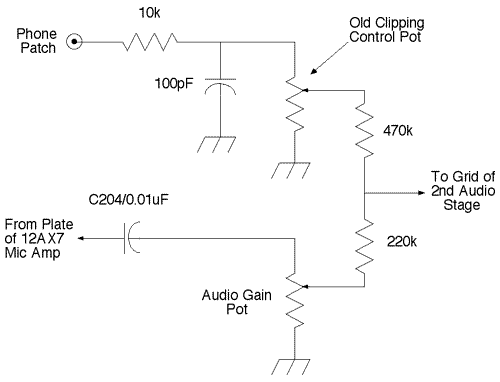
If you want an adjustable high-level/line-level input (good for when you want to bolt up some outboard audio processing to the 500), check out Figure 2.
Take your time in doing your work. Use the highest quality components. Reliability is the bottom line. Think about what a pain in the scrote it would be to have to remove all of those cabinet screws to replace a capacitor that was gleaned from an old TV set that was getting ready to crap out but waited for you to be the victim of its failure.
Good luck.